"I bought TONEX, but I don't know where to start."
"It's installed, but I can't figure out how to dial in a good tone."
This guide is for you.
TONEX is powerful, and that means the interface can feel overwhelming at first.
But the features you'll actually use every day are simple.
I've been playing guitar for 13 years and home recording for 5.
TONEX has been my main amp plugin in Logic Pro for a long time.
This guide is based on that experience.

What you
・How to install and authorize the TONEX plugin
・The fastest way to find great tones on ToneNET
・Tone-shaping basics and TONEX FX for home recording
・Fixes for latency and doubled monitoring sound
TONEX MAX currently sells for around ¥50,000 on its own. Right now, the Total Studio 5 MAX bundle costs less than that and includes AmpliTube 5 MAX and many other plugins (through July 31). If you've been thinking about buying, now is the time.
One note before we start: this article covers TONEX as a plugin.
Capturing your own amps (creating Tone Models) is covered in a separate article.
What Is the TONEX Plugin? How It Works in a Nutshell
TONEX is an amp simulator developed by IK Multimedia.
At its core is a proprietary technology called AI Machine Modeling.
AI captures the sound of real amps, cabs, and pedals with extremely high fidelity.
Each captured sound is called a "Tone Model".

The character of the sound? The air and space feel remarkably real.
The response under your fingers is close to a real amp too.
Here's a video comparing TONEX against Logic's stock amps.
The comparison covers clean to tweed-style tones.
Listen for the warmth and harmonic character that tweed-style amps are known for.
It's audio only — no talking, just tones.
Want to hear clean, crunch, and distortion in one video? This one runs through all of them.
In my own Logic Pro sessions, TONEX is my go-to amp plugin.
For my full thoughts on the sound, see my review below.
The Three TONEX Tiers
TONEX comes in three main tiers.
TONEX tiers
・TONEX CS: the free version. Start here if you just want to try it
・TONEX: the standard version. More Tone Models and features
・TONEX MAX: everything. Includes a huge set of premium Tone Models
Curious how far the free version can take you? I break it down here.
Setup: From Installation to Activation
Installing TONEX is painless if you use the dedicated app.
It takes three steps.
Step 1: Install IK Product Manager
First, download IK Product Manager from the IK Multimedia website.
It's the hub app that handles installation, authorization, and updates for all IK products.
TONEX, AmpliTube — everything installs through it.
Step 2: Register Your Serial and Install
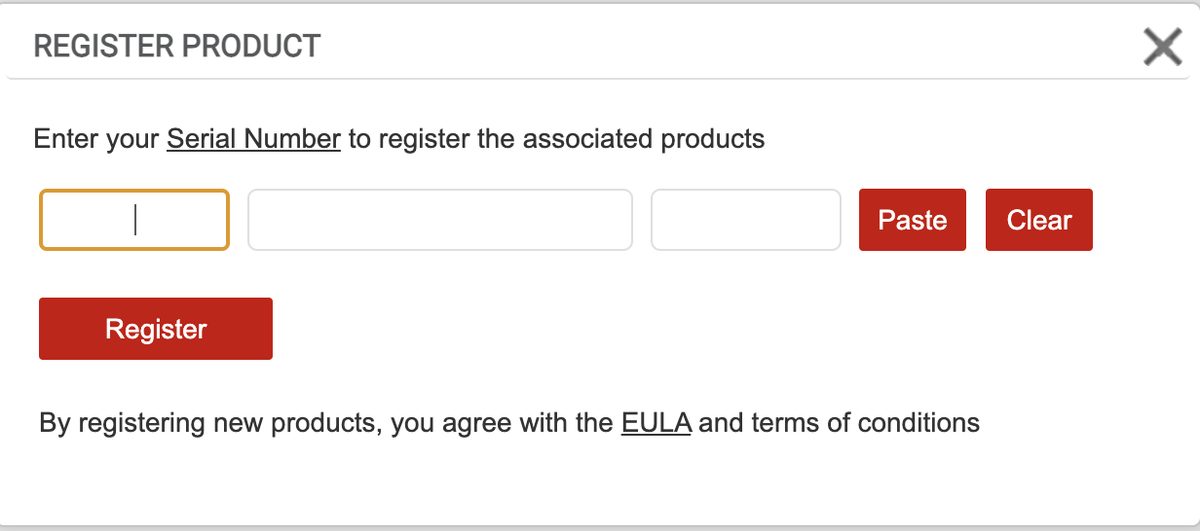
Log in to IK Product Manager and register the serial number from your purchase.
Once registered, TONEX appears in your product list.
Click "Install" to run the installation.
Step 3: Click "Authorize"
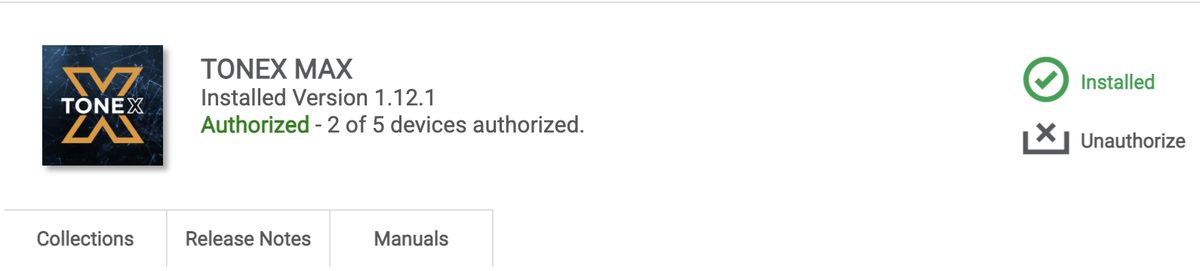
After installing, click the "Authorize" button to activate.
Skip this and the plugin won't launch — don't forget it.
Tip
Authorized but can't access ToneNET? Clicking "Unauthorize" and then "Re-authorize" fixes it in most cases.
Loading TONEX in Logic Pro
Setup done? Let's open TONEX in your DAW.
I'll use Logic Pro as the example.
Insert It on an Audio Track
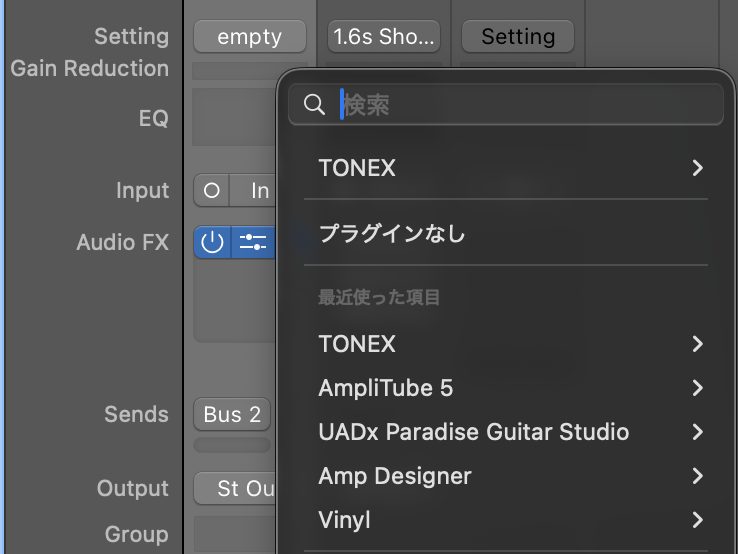
The process is simple.
Opening TONEX in Logic Pro
① Create an audio track
② Click the Audio FX slot
③ Choose "IK Multimedia" → "TONEX"
④ Turn on input monitoring and check the sound
Plug your guitar into the Hi-Z (Instrument) input on your audio interface.
New to recording in Logic Pro? This article walks through the basics from the start.
Golden Rule: Always Keep a Dry Signal
For home recording, I recommend recording the DI (dry) signal.
Keep the unprocessed signal, and you can swap tones freely later.
Just leave TONEX on the insert slot.
You still monitor through the amp sound while playing, so it feels natural.
Decide at mix time that you want a different amp? No re-recording needed.
This is the biggest advantage of running TONEX as a plugin.
How to Use ToneNET: Find Great Tones Fast
The real power of TONEX lives in ToneNET, its sharing platform.
It's where users and artists worldwide share their captures.
You get free access to thousands of Tone Models.
Start Your Search with "Most Liked"
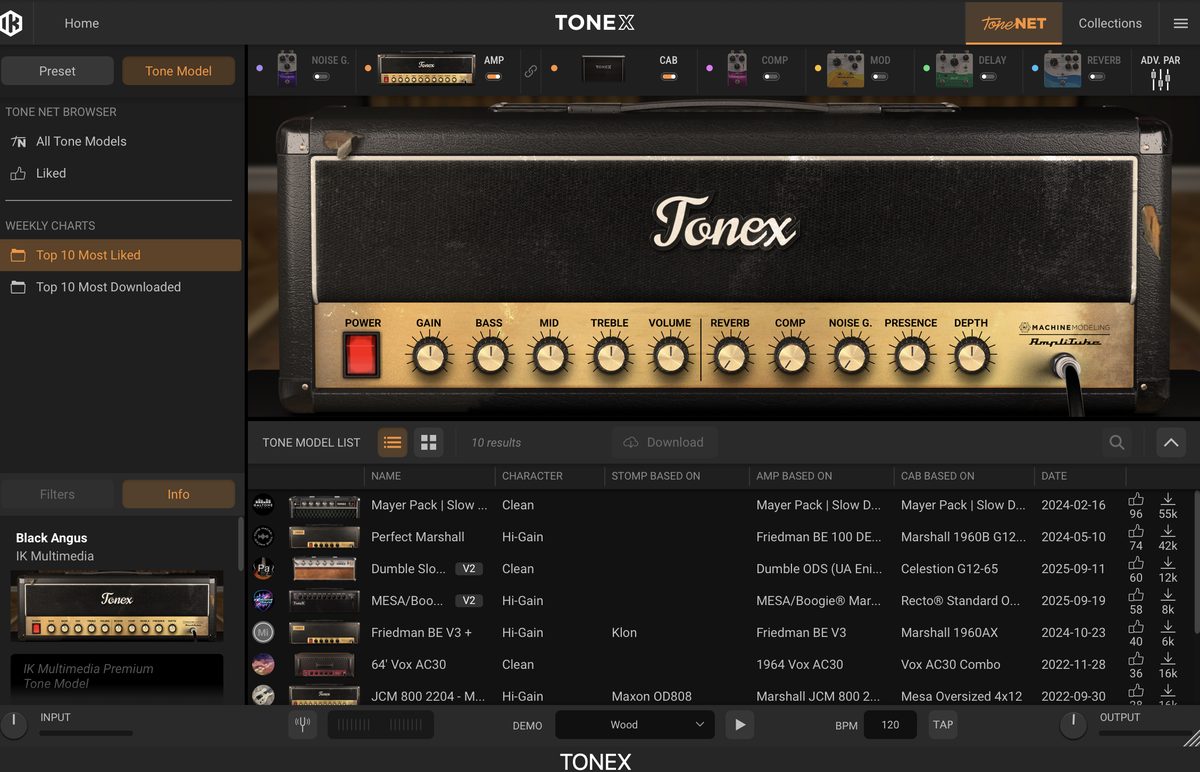
The first place to look: "Top 10 Most Liked" in the WEEKLY CHARTS.
These are the models ranked highest by user likes.
ToneNET quality varies a lot, but this chart is consistently good.
There's also a "Top 10 Most Downloaded" — check both.
One Click to Audition Any Model
Auditioning tones in the plugin's ToneNET browser is effortless.
Click a model in the list.
That's it — the tone loads instantly.
Do this while playing your guitar in the DAW.
You can flip through models one after another and compare.
Reset the AMP Knobs to 12 O'Clock Before Auditioning
Here's a detail most people miss.
The AMP section in TONEX has Gain and EQ knobs.
Those knob positions carry over when you switch models.
So what happens if you left Treble boosted on the previous model?
The next model sounds harsh in the highs too.
Want to hear a model as intended? Reset the knobs to 12 o'clock.
This one habit makes your comparisons far more accurate.
Found a keeper? Download it to your local library and customize it as your own preset.
Tone-Shaping Basics: Knobs and TONEX FX
Picked a Tone Model? Time to shape the sound.
The Main Parameters Work Like a Real Amp
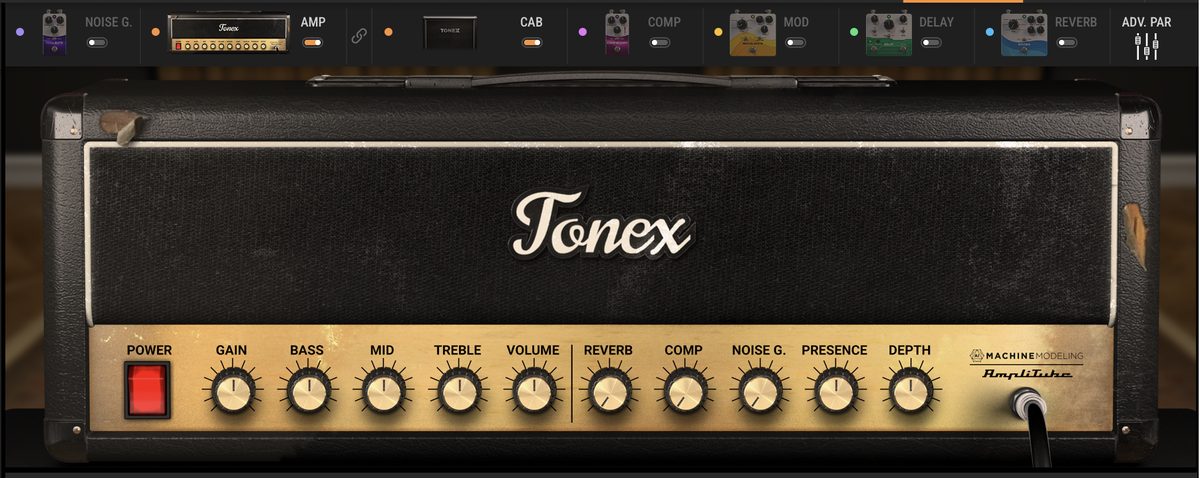
If you've used a real amp, you already know how to use TONEX.
Main parameters
・Gain: amount of drive
・Bass / Mid / Treble: 3-band EQ
・Presence / Depth: top-end bite / low-end punch
・Vol: output level
Build the core of your tone with just Gain and EQ.
If you picked the right model, you won't need big adjustments.
Crunch tones respond especially well to Gain adjustments.
You can hear the texture in this comparison against Logic's stock amps.
Listen on headphones or earbuds — the difference in crunch definition and air is much easier to hear.
TONEX FX: Complete Your Sound Inside the Plugin
An update added TONEX FX, which greatly expands the effects on board.
On top of the existing noise gate, compressor, and reverb, you get eight new effects.
What
・Modulation: chorus / flanger / tremolo / phaser / rotary
・Delay: digital / tape
・Reverb: spring (4 variations)
The key feature: each effect can go before the amp (Pre) or after it (Post).
You build it exactly like a real pedalboard.
Chorus up front, delay and reverb after the amp — that kind of thinking.
Not sure about effect order? This article covers how to think about signal chains.
Set Up the Noise Gate Early
Using high-gain Tone Models? A noise gate is non-negotiable.
This comparison video shows what TONEX can do with high gain.
Listen for how tight the distortion stays and how well note definition survives under heavy gain.
Gate setup is easy.
Reverb, Compression, and Noise Gate live in the secondary parameters.
Hearing hiss or buzz? Adjust the gate threshold.
If the noise still won't go away, the cause may be your cables or environment.
Three Recording Workflows for Home Studios
Here are the three most common ways to run TONEX in a DAW.
1. Record Dry, Process Later (The Standard)
As covered above, this is the default — and the strongest option.
Record the dry signal, and keep TONEX as an insert effect.
It's a non-destructive workflow where you can swap tones anytime.
2. Print the Amp Sound (Saves CPU)
This means recording the processed TONEX sound directly.
It helps in big projects where track count pushes your CPU.
You have to commit to the tone, but mix decisions get faster in return.
3. Record Dry and Wet Together (Best of Both)
This method splits your input.
The processed sound and the DI go to separate tracks, recorded simultaneously.
You get the confidence of a committed tone, plus the insurance of a dry track.
A greedy setup — in a good way.
Troubleshooting: Latency and Doubled Sound
Here are the two most common problems TONEX users run into.
Fixing Latency (Delayed Sound)
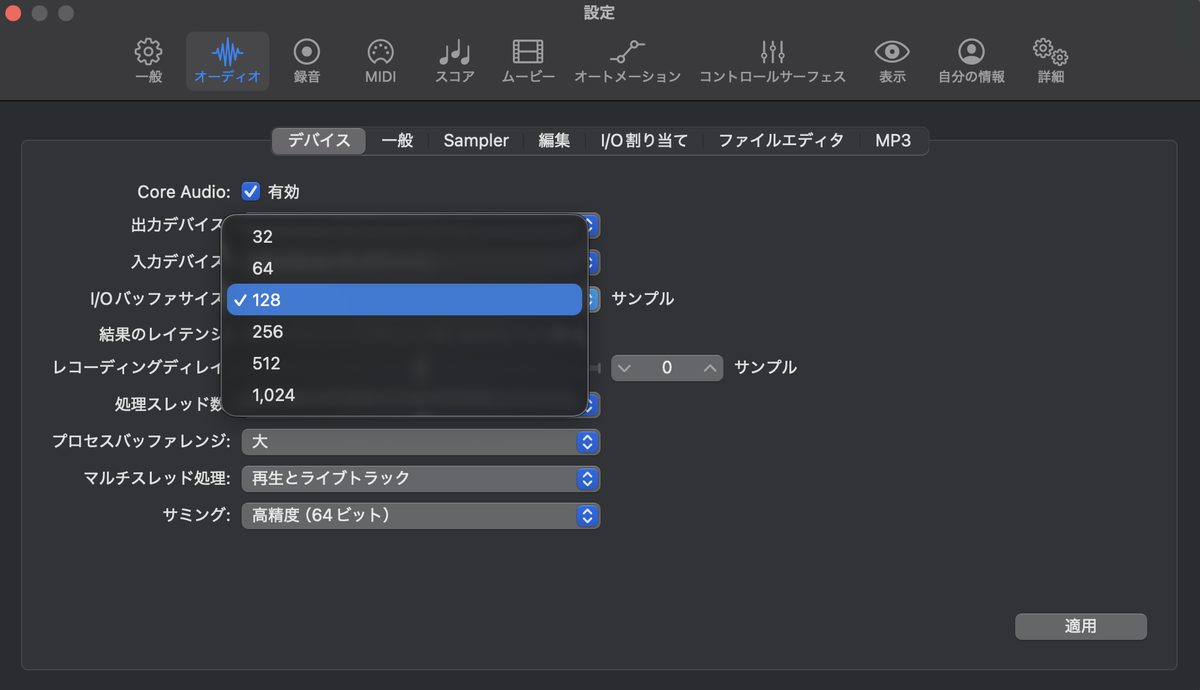
Notice a delay between your pick attack and the sound? Lower your buffer size.
Low-latency settings
・Set the buffer size to 128 or lower
・The standard approach: small buffer for tracking, large buffer for mixing
・On Windows, use the dedicated ASIO driver (unchecking Safe Mode makes it even faster)
On Mac, change the I/O buffer size in Logic Pro under Settings → Audio.
Fixing Doubled (Echo-Like) Monitoring
Hearing your guitar twice? That's doubled monitoring.
You're hearing both the direct signal from your interface and the processed signal from the computer.
The fix is simple.
Turn off Direct Monitoring on your interface.
Listen only to the computer's output and the doubling disappears.
Library Management and Backup
Your collected Tone Models and presets are valuable assets.
Back them up regularly.
Just Copy Library.db
All of your TONEX data lives in a single file.
The file to back up
Mac: Documents/IK Multimedia/TONEX/Library.db
Windows: C:\Users\YourName\Documents\IK Multimedia\TONEX\Library.db
Copy this file and you can migrate every Tone Model and preset in one move.
It's a lifesaver when you switch computers.
You Can't Export a Tone Model by Itself
One caveat.
Tone Models can't be exported individually.
To export one, save it as a Preset first, then export at the preset level.
Which TONEX Tier Should You Get?
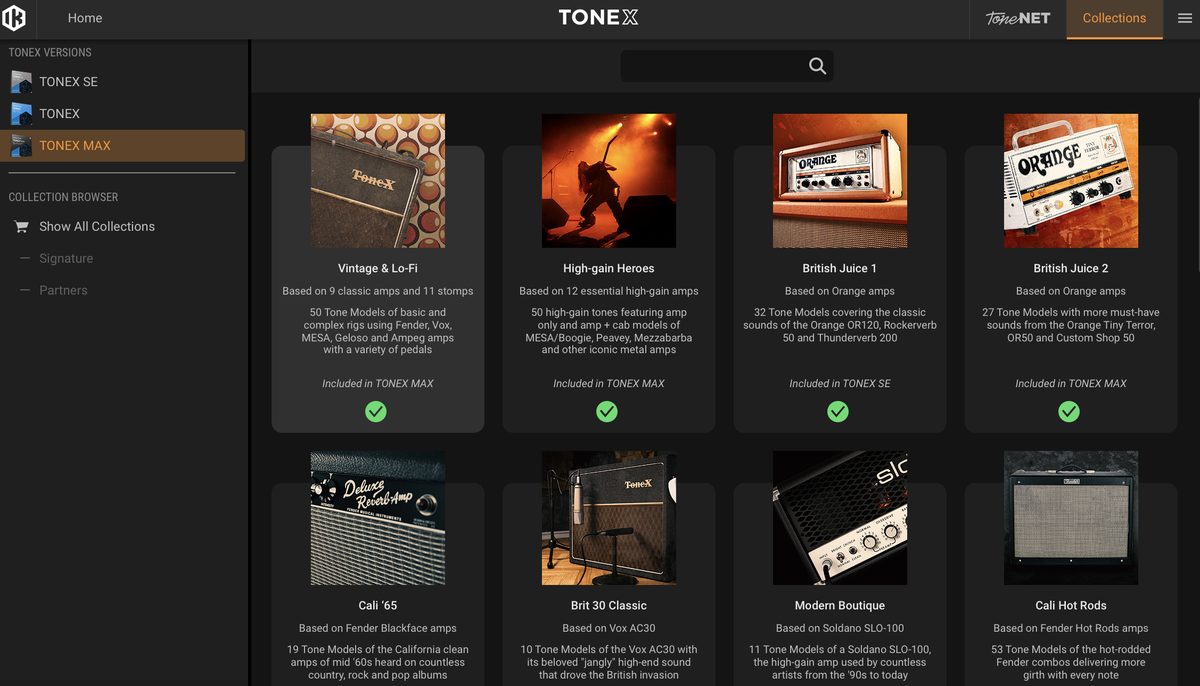
Everything covered so far works largely with the free TONEX CS.
But if TONEX is going to be the core of your home recording setup, TONEX MAX is the answer.
The sheer volume of premium Tone Models is on another level.
Whatever tone you're chasing, it's probably in there.
Want to hear the clean tones back to back? Start here.
And here's a run-through of the drive and distortion presets.
I've used MAX for years.
For home recording amps, it's the only plugin I've needed.
Prices change, so check the link for the current price.
This plugin gets deep discounts during sales.
Check the Current TONEX MAX Price
Limited-Time Coupon Deal: Total Studio 5 MAX
¥104,580 → ¥25,493 with the coupon, through July 31 only. That's cheaper than TONEX MAX alone (around ¥50,000), and the bundle includes AmpliTube 5 MAX and more. Full sale details and the included plugins are covered in the article below.
Check Total Studio 5 MAX (Limited Time)
Torn between TONEX and AmpliTube 5 as your main platform? This comparison will help.
Summary: TONEX Is Just "Find, Tweak, Record"
Here are the key points one more time.
Key takeaways
・Setup: install and authorize through IK Product Manager
・ToneNET: audition from "Top 10 Most Liked" with knobs reset to 12 o'clock
・Tone shaping: start with Gain and EQ; TONEX FX handles modulation and ambience
・Recording: dry DI signal with TONEX as an insert is the standard
・Back up Library.db to protect your tone library
TONEX has a lot of features, but the daily workflow is simple.
Find it on ToneNET → tweak the knobs → record the DI.
Master these three steps and dialing in tones at home gets dramatically easier.
Start with the top Most Liked models and hear them through your own guitar.