Drum mixes just aren't working.
I'm sure many home-recording band players feel that way.
The cause is often not thinking of plugin roles separately.


This article explains drum mixing in 3 layers.
I'm ryo, 13 years of guitar and 8 years of DTM, and I put this together based on the plugins I actually use.
What you'll learn in this article
The 3-layer structure of drum plugins / specific options for each layer / handling the bands that clash with guitar / how to build up by budget
About yen prices
Prices in yen are Japanese street prices. As a rough guide at about 150 yen per US dollar: 5,000 yen is about $33, 10,000 yen about $67, 20,000 yen about $133, 30,000 yen about $200, 50,000 yen about $333 and 100,000 yen about $667. Prices in your region will differ, so check current prices before buying.
Think of Drum Mixing in 3 Layers: "Source, Processing, Character"
First, the big picture.
Drum plugins split into three by role.
| Layer | Role | Examples |
|---|---|---|
| 1. Source | Plays the drum sound itself | MODO DRUM / BFD3 |
| 2. Processing | Shapes it with EQ and compression | T-RackS 5 / DAW stock |
| 3. Character | Adds air and cohesion | UAD Sound City Studios / Eddie Kramer Drum Channel |
These three take effect in order.
If the sound is thin at layer 1, adding at layers 2 and 3 has limits.
If you're unsure, review from the upper layer. That alone often solves it.
Layer 1: Source Plugins | First Decide the Skeleton of the Sound
If you make drums by programming, you need a source.
The choice here decides most of how it ends up.
MODO DRUM | Physical Modeling That's Light to Handle
MODO DRUM is a physical modeling source from IK Multimedia.
It is not a method that plays back samples.
It calculates the structure of the drums to generate the sound.
That's why you can change the shell material and head tension afterward.
You can also adjust where it's struck.
Being able to make fixes like "I want more core in the snare" during the mix is a big deal.
It is light on storage too.
It loads fast, so it suits making demos.
-

-
MODO DRUM Review | Can Physical Modeling Drums Work for Guitarists' Home Recording?
What Is MODO DRUM? How Physical Modeling Works MODO DRUM is a drum plugin developed by IK Multimedia. Its defining feature is "physical modeling" (modal synthesis). A typical drum plugin plays back pre-recorded audio. MODO DRUM doesn't. It calculates the drum's material, size, tension, and more in real time — generating the sound from physics. Aspect Sample-Based Plugins MODO DRUM Sound generation Plays back recorded waveforms Real-time synthesis from physics Storage Tens to hundreds of GB About 11.5GB Playing realism Switching between recorded hits Infinite gradation by hit position and dynamics Customization Choose samples Build the sound with parameters My ...
You can check where to buy here.
See MODO DRUM 1.5 at Plugin Boutique
BFD3 | Multi-Mic Information Brings Out the Live Feel
BFD3 is a sample-based source.
It was recorded in a real studio with multiple mics.
Kick, snare, overheads and room are provided separately.
Its strength is that you can build the balance of each mic yourself.
Raise the room mic and it suddenly feels live.
Pull it down and it gets tight.
The storage size is large.
But the amount of information is correspondingly large.
-

-
BFD3 Review: Honest Long-Term Thoughts from a Home-Recording Guitarist
When you record a band sound at home, drums are the first wall you hit. For many guitarists, it's the hardest part of the whole process. I (ryo) own BFD3. I also own MODO DRUM by IK Multimedia, and I switch between them depending on the track. In this review, I'll be honest about who should buy BFD3 — and who shouldn't. What Is BFD3? A Quick Overview BFD3 is a software drum instrument developed by BFD (now under inMusic). It first launched in 2013. Today, buying BFD3 installs BFD3.5. In one sentence: BFD3 is a realism-first drum instrument built ...
You can check where to buy here.
See BFD 3.5 at Plugin Boutique
MODO DRUM or BFD3: Which to Choose
There is a video where I compared them on the same phrase.
I compared them with a grunge-style phrase.
The tendencies are like this.
| MODO DRUM | BFD3 | |
|---|---|---|
| Method | Physical modeling | Multi-mic samples |
| Sound tendency | Clear and polished | Raw, with lots of information |
| Storage size | Light | Heavy |
| Changing the sound afterward | Strong | Adjust by mic balance |
| Best for | Getting it into shape quickly | Getting closer to live drums |
-
-
MODO DRUM vs BFD3 | Which Suits Band Home Recording? A Comparison from an Owner of Both
Basic Spec Comparison of MODO DRUM and BFD3 First, let me sort out the differences in the basic specs. Item MODO DRUM BFD3 Developer IK Multimedia BFD (now inMusic) Sound generation Physical modeling (real-time calculation) Recorded sampling Number of kits 13 kits 7 core kits (expanded to 51 kits and 60 presets in BFD3.5) Free space needed Official minimum requirement is 20 GB or more About 55 GB (about 100 GB of free space needed during installation) CPU load Higher (because of real-time calculation) Relatively low MIDI patterns 1,400+ built in Includes groove patterns (real performance data) List price Check ...
Layer 2: Processing Plugins | Shape It with EQ and Compression
Once the source is decided, move on to processing.
Here, DAW stock plugins can take you quite far.
Try building with the stock ones first.
EQ | The Bands to Touch Are Set for Each Part
If you touch drum EQ blindly, it gets muddy.
Having a guideline for each part makes it faster.
| Part | Band | Effect |
|---|---|---|
| Kick | 50 to 80 Hz | Low end you feel in the body |
| Kick | 200 to 400 Hz | Cutting it brings out the outline |
| Kick | 2 to 4 kHz | Attack (the beater's sound) |
| Snare | 150 to 250 Hz | Body and thickness |
| Snare | 5 to 8 kHz | Snare wire cut-through |
| Hi-hat | Below 300 Hz | Low cut recommended |
| Overheads | Below 200 Hz | Low cut clears the muddiness |
What works especially well is handling 200 to 400 Hz.
If it builds up here, the whole thing turns boomy.
Cutting it just a little improves clarity.
Compression | Overdo It and the Liveliness Disappears
Separate the purposes of drum compression.
One is the purpose of evening out the grain.
Use a shallow ratio and a slower attack.
If you make the attack too fast, the strike point disappears.
The other is the purpose of adding character.
This one is applied deeply to crush the sound.
But if you do it on the main track, the liveliness dies.
That's where parallel compression comes in.
Parallel Compression | Mix in the Crushed Sound
The steps are simple.
Parallel compression steps
1. Make a send from the drum bus / 2. Insert a deeper compressor on the destination / 3. Add the crushed sound to the original little by little
The original strike point stays.
Only density is added on top.
It works when the drums don't come forward.
Transient Tools | Shape the Attack Directly
More intuitive than EQ and compression are transient tools.
You can raise or lower the attack and sustain separately.
When you want to bring out the snare's strike.
When you want to reduce the room's ring.
In scenes like these, it solves things in one go.
T-RackS 5 | If I Name One, It's The Farm Stone Room
Buying processing individually gets expensive.
To get them together, IK's T-RackS 5 is realistic.
It has many modules, and many people get lost.
If I name just one for drums, it's TR5 The Farm Stone Room.
It is a room-type plugin that recreates a real studio.
Just blending it lightly into the drum bus adds the air of a room.
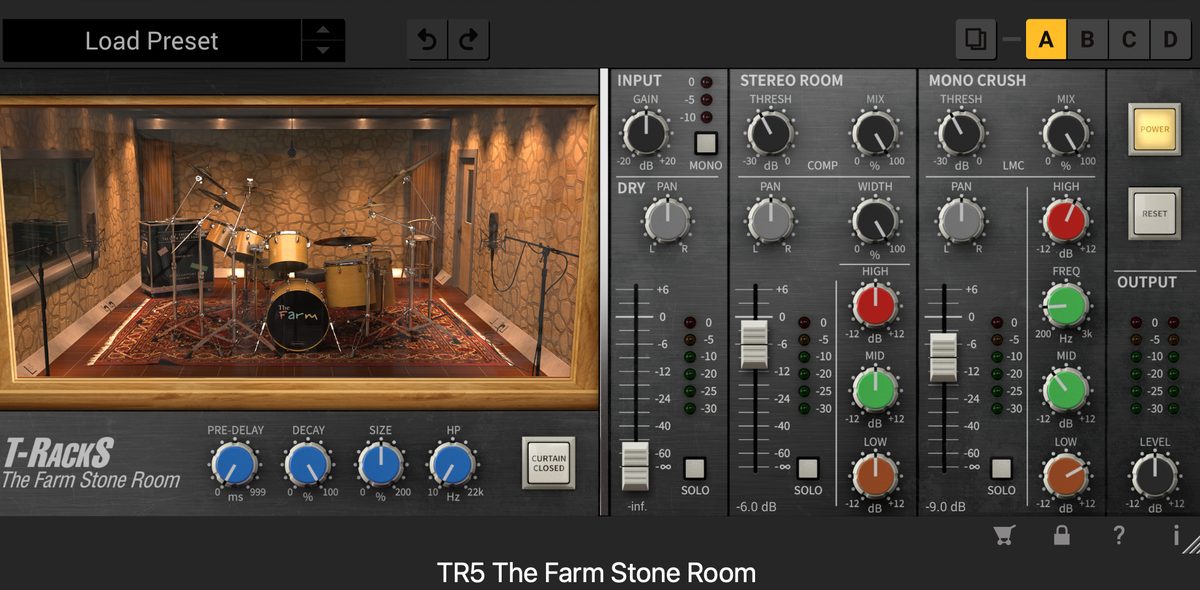
You mix STEREO ROOM and MONO CRUSH.
The trick is not to push MIX too deep.
Think of it as adding only depth while keeping the outline of the original sound.
With Total Studio 5 MAX, you get T-RackS 5 MAX and MODO DRUM together.
It solves source and processing at once.
See Total Studio 5 MAX at Plugin Boutique
If you want T-RackS on its own, the current version is T-RackS 6 MAX.
See T-RackS 6 MAX at Plugin Boutique
I plan to explain how to use each T-RackS 5 module in a separate article.
-

-
When Are DTM Plugin Sales? The Best Time to Buy Each Year (Saved Guide)
"I want to buy a plugin or virtual instrument, but I wonder if I'll regret buying now..." If you keep up with DTM, you will always run into this worry. The short answer: DTM plugins and virtual instruments have clear sale seasons. And buying at Black Friday in November every year is almost always the best value. This article is written by someone with guitar and home-recording experience. It puts together the yearly sale schedule and "when to buy what." Conclusion: Black Friday in November Is the Strongest Every Year Before the details, let me give you the conclusion. The ...
Layer 3: Character Plugins | Add Cohesion and Air
Once processing is done, the sound is in order.
But it tends to become tidy yet scattered.
This is where character plugins work.
UAD Sound City Studios | Pull It Together with Re-Miking
Sound City Studios is a re-miking plugin.
It is not a reverb.
It adds a resonance as if the sound were replayed in a real studio.
Insert it on the drum bus and the room sound becomes shared.
Kick, snare and cymbals stand in the same space.
Here is a video comparing it ON and OFF.
-

-
UAD Sound City Studios Review — How This Plugin Fixed My "Disconnected
"My home-recorded guitar always sounds disconnected from the mix." That was a problem I dealt with for a long time. The tone itself wasn't bad. But next to real drums and bass, my guitar always sounded like it was recorded in a different room. One plugin fixed that "disconnected" feeling almost instantly: UAD Sound City Studios. I've been playing guitar for 13 years and producing music at home for 5. In this review, I'll share my honest, long-term experience with this plugin. For context, my own taste leans toward 90s alternative and grunge. Who this review is for Your home-recorded ...
Waves Eddie Kramer Drum Channel | One Plugin Sets the Direction
It is a channel strip dedicated to drums.
EQ, compression, gate and saturation are integrated.
Its feature is that it has a mode for each part.
Kick, snare, toms, overheads, room.
Each has settings optimized for it.
There are few knobs.
It isn't the type you build in fine detail.
In exchange, just inserting one sets the direction.
It Works Especially Well on Overheads and Room
These two are where I personally felt the effect.
Overheads are a difficult part to process.
That's because cymbals easily get harsh.
But if you low-cut too much, it gets hollow.
The room is the same.
Raise it and it feels live, but it easily gets muddy.
Here is the sound of these two presets.
Which Layer Do You Use It In?
This plugin sits between layer 2, processing, and layer 3, character.
It also has the roles of EQ and compression.
At the same time, it adds character through saturation.
So there are two ways to use it.
| Use | Where to insert | Effect |
|---|---|---|
| As processing | On each part's track | Replaces EQ and compression |
| As character | On the drum bus | Adds cohesion overall |
Waves mainly sells direct from its own site. Note that where you buy and when its sales happen differ from other companies.
Reverb | Add Too Much and It Gets Muddy
The basics of drum reverb is to keep it short.
Room and plate types are easy to handle.
If you put a long hall type on everything, it gets muddy.
Using it on the snare only is the safe approach.
[Important] The Bands Where Guitar and Drums Clash
This is a worry specific to home-recording band players.
The drums sound good alone, but disappear when you stack the guitar.
The cause is a fight over frequency bands.
| Band | What competes | Fix |
|---|---|---|
| 80 to 120 Hz | Kick x bass | Cut one of them |
| 200 to 400 Hz | Snare body x guitar's boxiness | Cut on the guitar side |
| 2 to 4 kHz | Snare strike x guitar distortion | Cut a little on the guitar side |
| 8 kHz and up | Cymbals x guitar's grit | Low-pass the guitar |
The basic policy is simple.
Don't cut the drums, cut the guitar.
That's because drums are the foundation of the song.
This matters especially in genres with thick guitars, like alternative.
The more guitar you layer, the less room the drums have.
-
-
Mixing Basics | Putting Together Two Guitars, Bass, Drums and Vocals
What Is Mixing? Why Is It Needed?If you stack recorded sounds as they are, problems like these happen. The guitar is too loud and you can't hear the bass The whole thing is "muddy" and doesn't cut through Only the drums sound like they're floating You don't need to overthink it. Once you have the basics, it comes together well. The Basic Mixing Steps | Follow This Order and You Won't Get Lost The steps are simple. First, turn off EQ and compression on all tracks. Build a balance that works with raw volume alone. Spread the instruments left and ...
The Actual Order of Processing
If you're unsure, build in this order.
Steps for drum mixing
1. Decide the kit and sound with the source / 2. Tidy each part with a low cut / 3. Adjust 200 to 400 Hz with EQ / 4. Even out the grain with compression / 5. Add density with parallel compression / 6. Add air with a room-type plugin on the drum bus / 7. Cut the guitar side so they coexist
Spend the most time on step 1.
Once that's decided, the rest is fine-tuning.
3 Common Mistakes
Mistake 1: Adding too much with EQ
"There's not enough low end, so I add low end."
That rarely solves it.
Instead, cutting the bands that get in the way works better.
Mistake 2: The compressor's attack is too fast
If you make the attack fast, the strike point gets crushed.
The drums' liveliness disappears.
Try a slower one first.
Mistake 3: Putting reverb on everything
If you put the same reverb on every part, it gets muddy.
Kick basically doesn't need it.
Think of it centered on the snare.
How to Build Up by Budget
| Budget | Setup | Comment |
|---|---|---|
| Zero | DAW stock only | Logic's stock can go quite far |
| Up to about 30,000 yen | Add one source | MODO DRUM etc. The biggest effect |
| Up to about 100,000 yen | Source plus a processing bundle | Together with Total Studio 5 MAX etc. |
| More than that | Add character plugins | Sound City Studios, Eddie Kramer Drum Channel etc. |
The priority is source → processing → character.
You're less likely to fail if you don't break this order.
Also Worth Reading
What Is Mixing? Why Is It Needed?If you stack recorded sounds as they are, problems like these happen. The guitar is too loud and you can't hear the bass The whole thing is "muddy" and doesn't cut through Only the drums sound like they're floating You don't need to overthink it. Once you have the basics, it comes together well. The Basic Mixing Steps | Follow This Order and You Won't Get Lost The steps are simple. First, turn off EQ and compression on all tracks. Build a balance that works with raw volume alone. Spread the instruments left and ... "I want to buy a plugin or virtual instrument, but I wonder if I'll regret buying now..." If you keep up with DTM, you will always run into this worry. The short answer: DTM plugins and virtual instruments have clear sale seasons. And buying at Black Friday in November every year is almost always the best value. This article is written by someone with guitar and home-recording experience. It puts together the yearly sale schedule and "when to buy what." Conclusion: Black Friday in November Is the Strongest Every Year Before the details, let me give you the conclusion. The ...
Mixing Basics | Putting Together Two Guitars, Bass, Drums and Vocals
When Are DTM Plugin Sales? The Best Time to Buy Each Year (Saved Guide)
Summary
Drum mixing can be sorted by thinking in 3 layers.
1. Decide the skeleton with the source.
2. Shape it with EQ and compression.
3. Pull it together with character plugins.
And for a home-recording band player, the view of cutting on the guitar side is indispensable.
Fixing the guitar is often faster than fixing the drums.